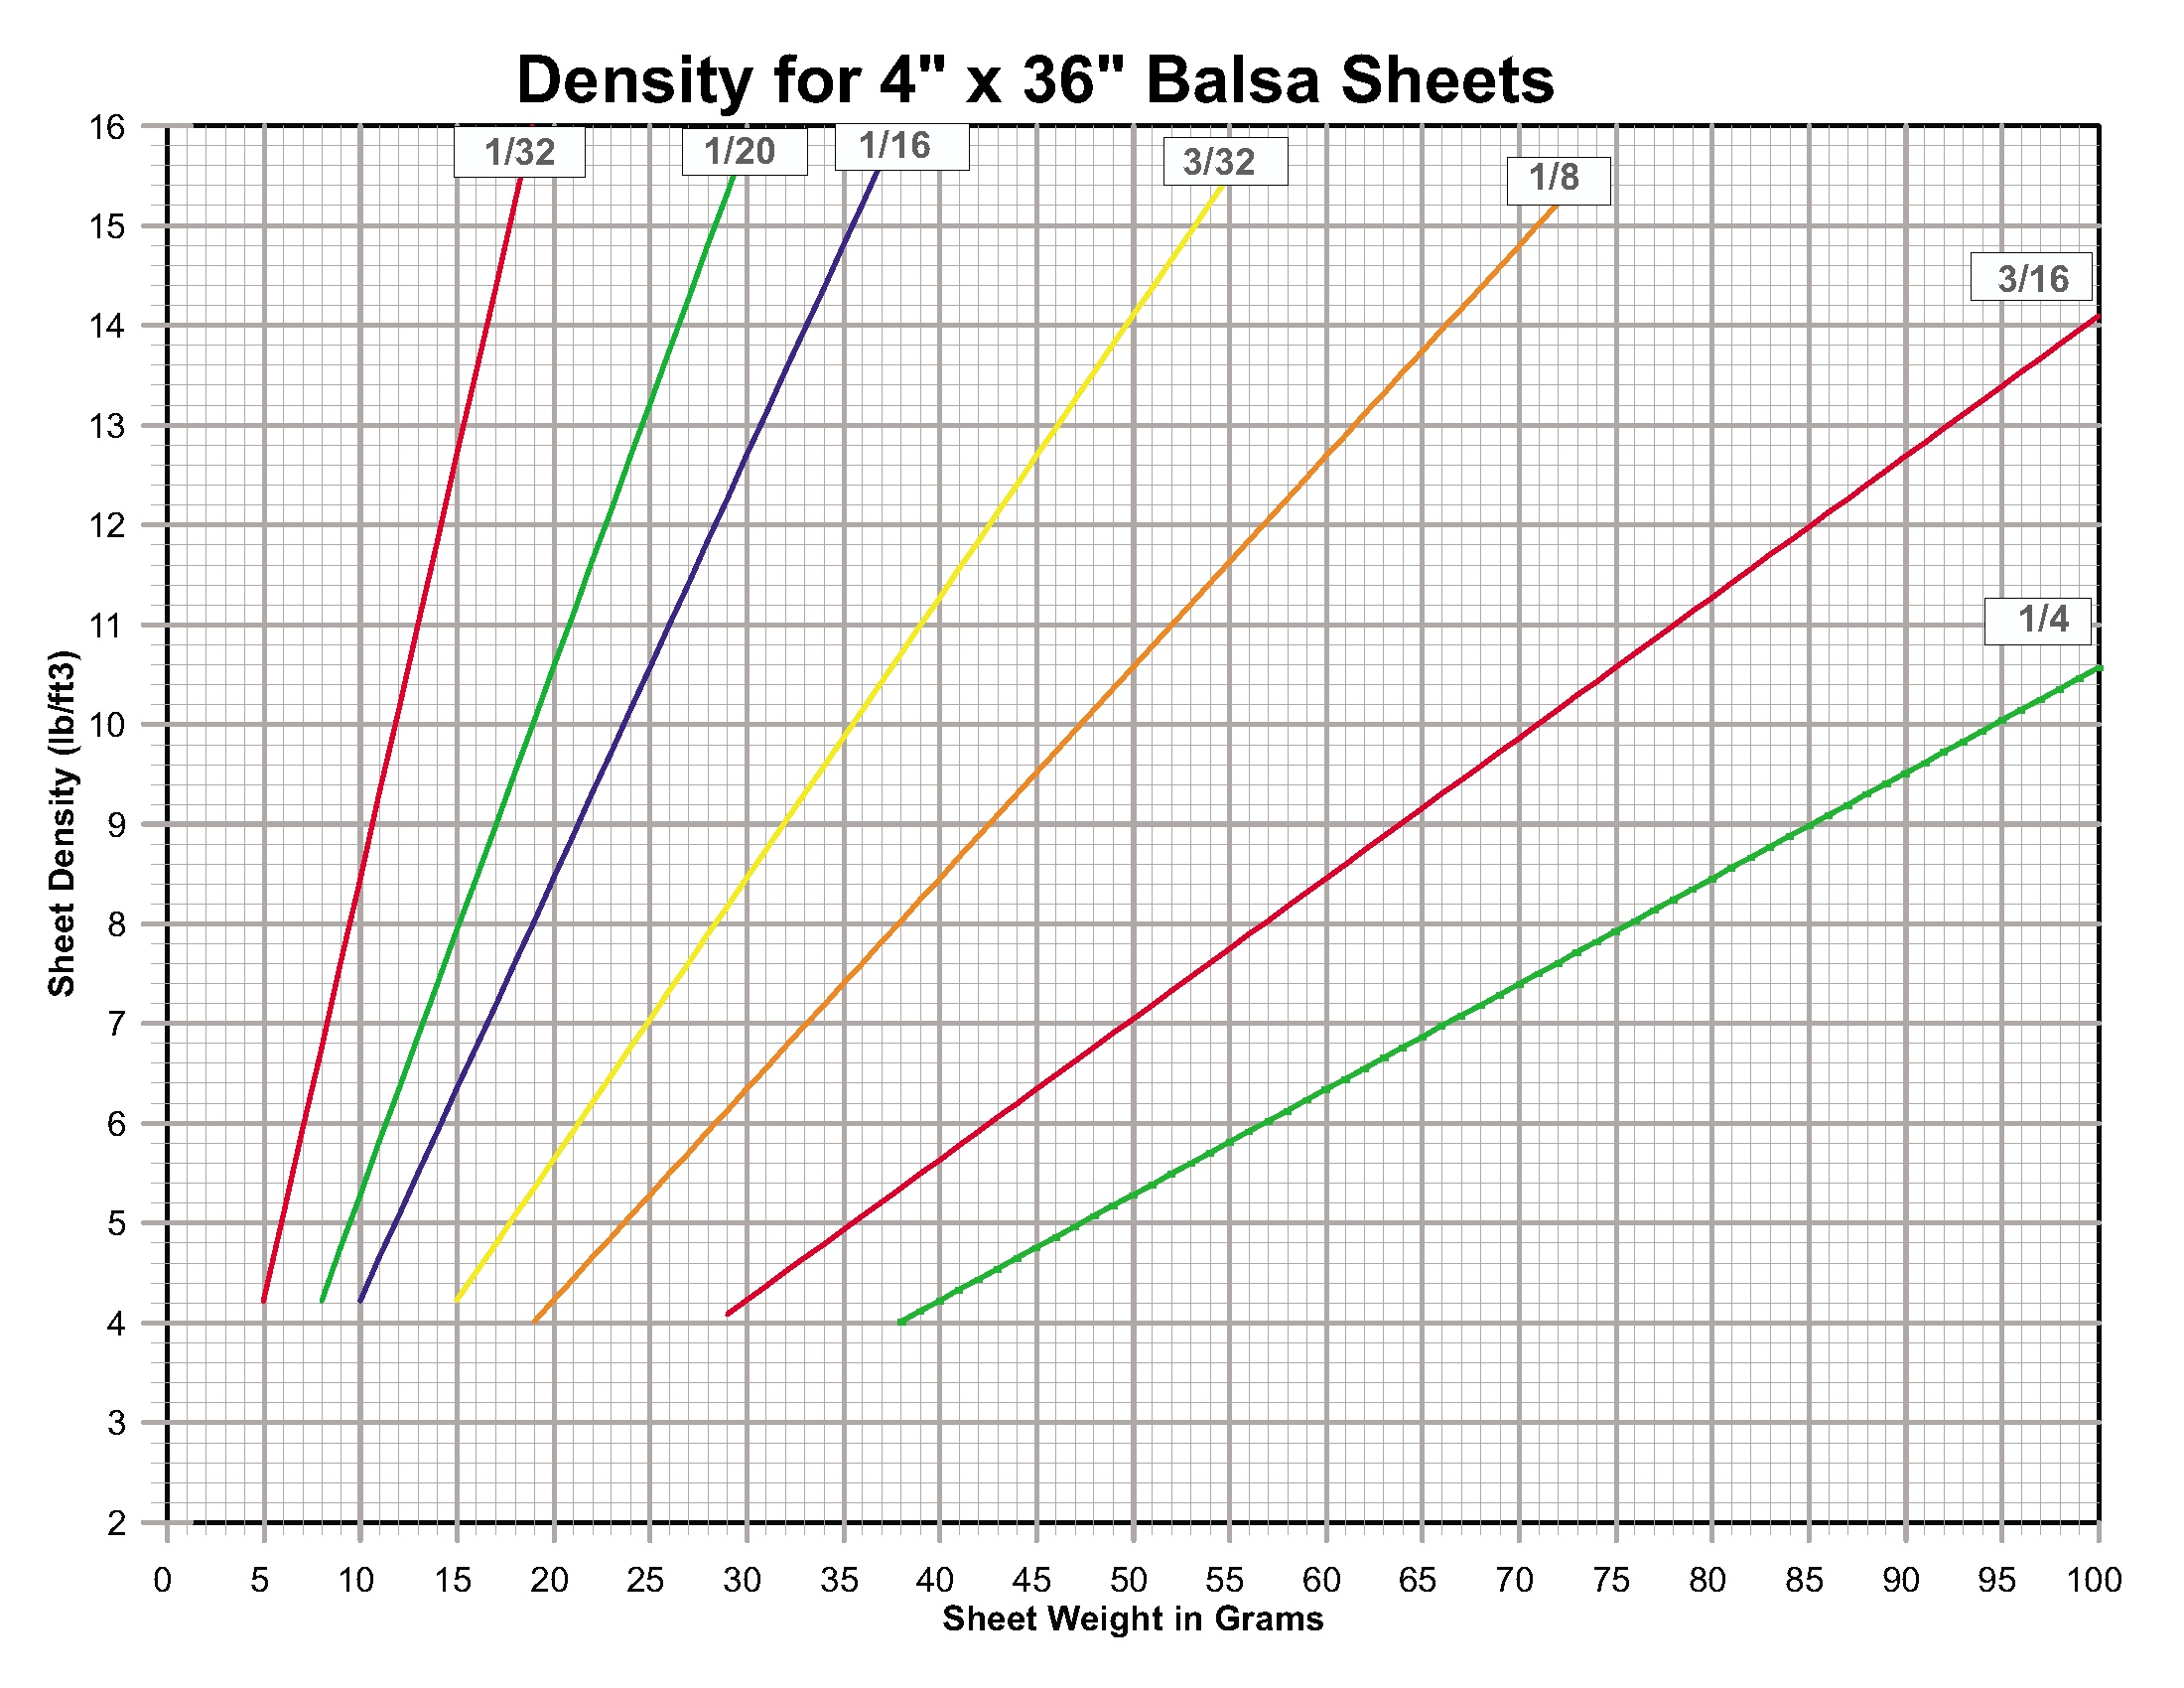
These charts are helpful in selecting wood for a given project. Based on the size of the balsa sheet of interest, look up the weight of the sheet on the chart. You can then read the corresponding density in pounds per cubic foot. That density value is the most frequently used by model airplane builders.
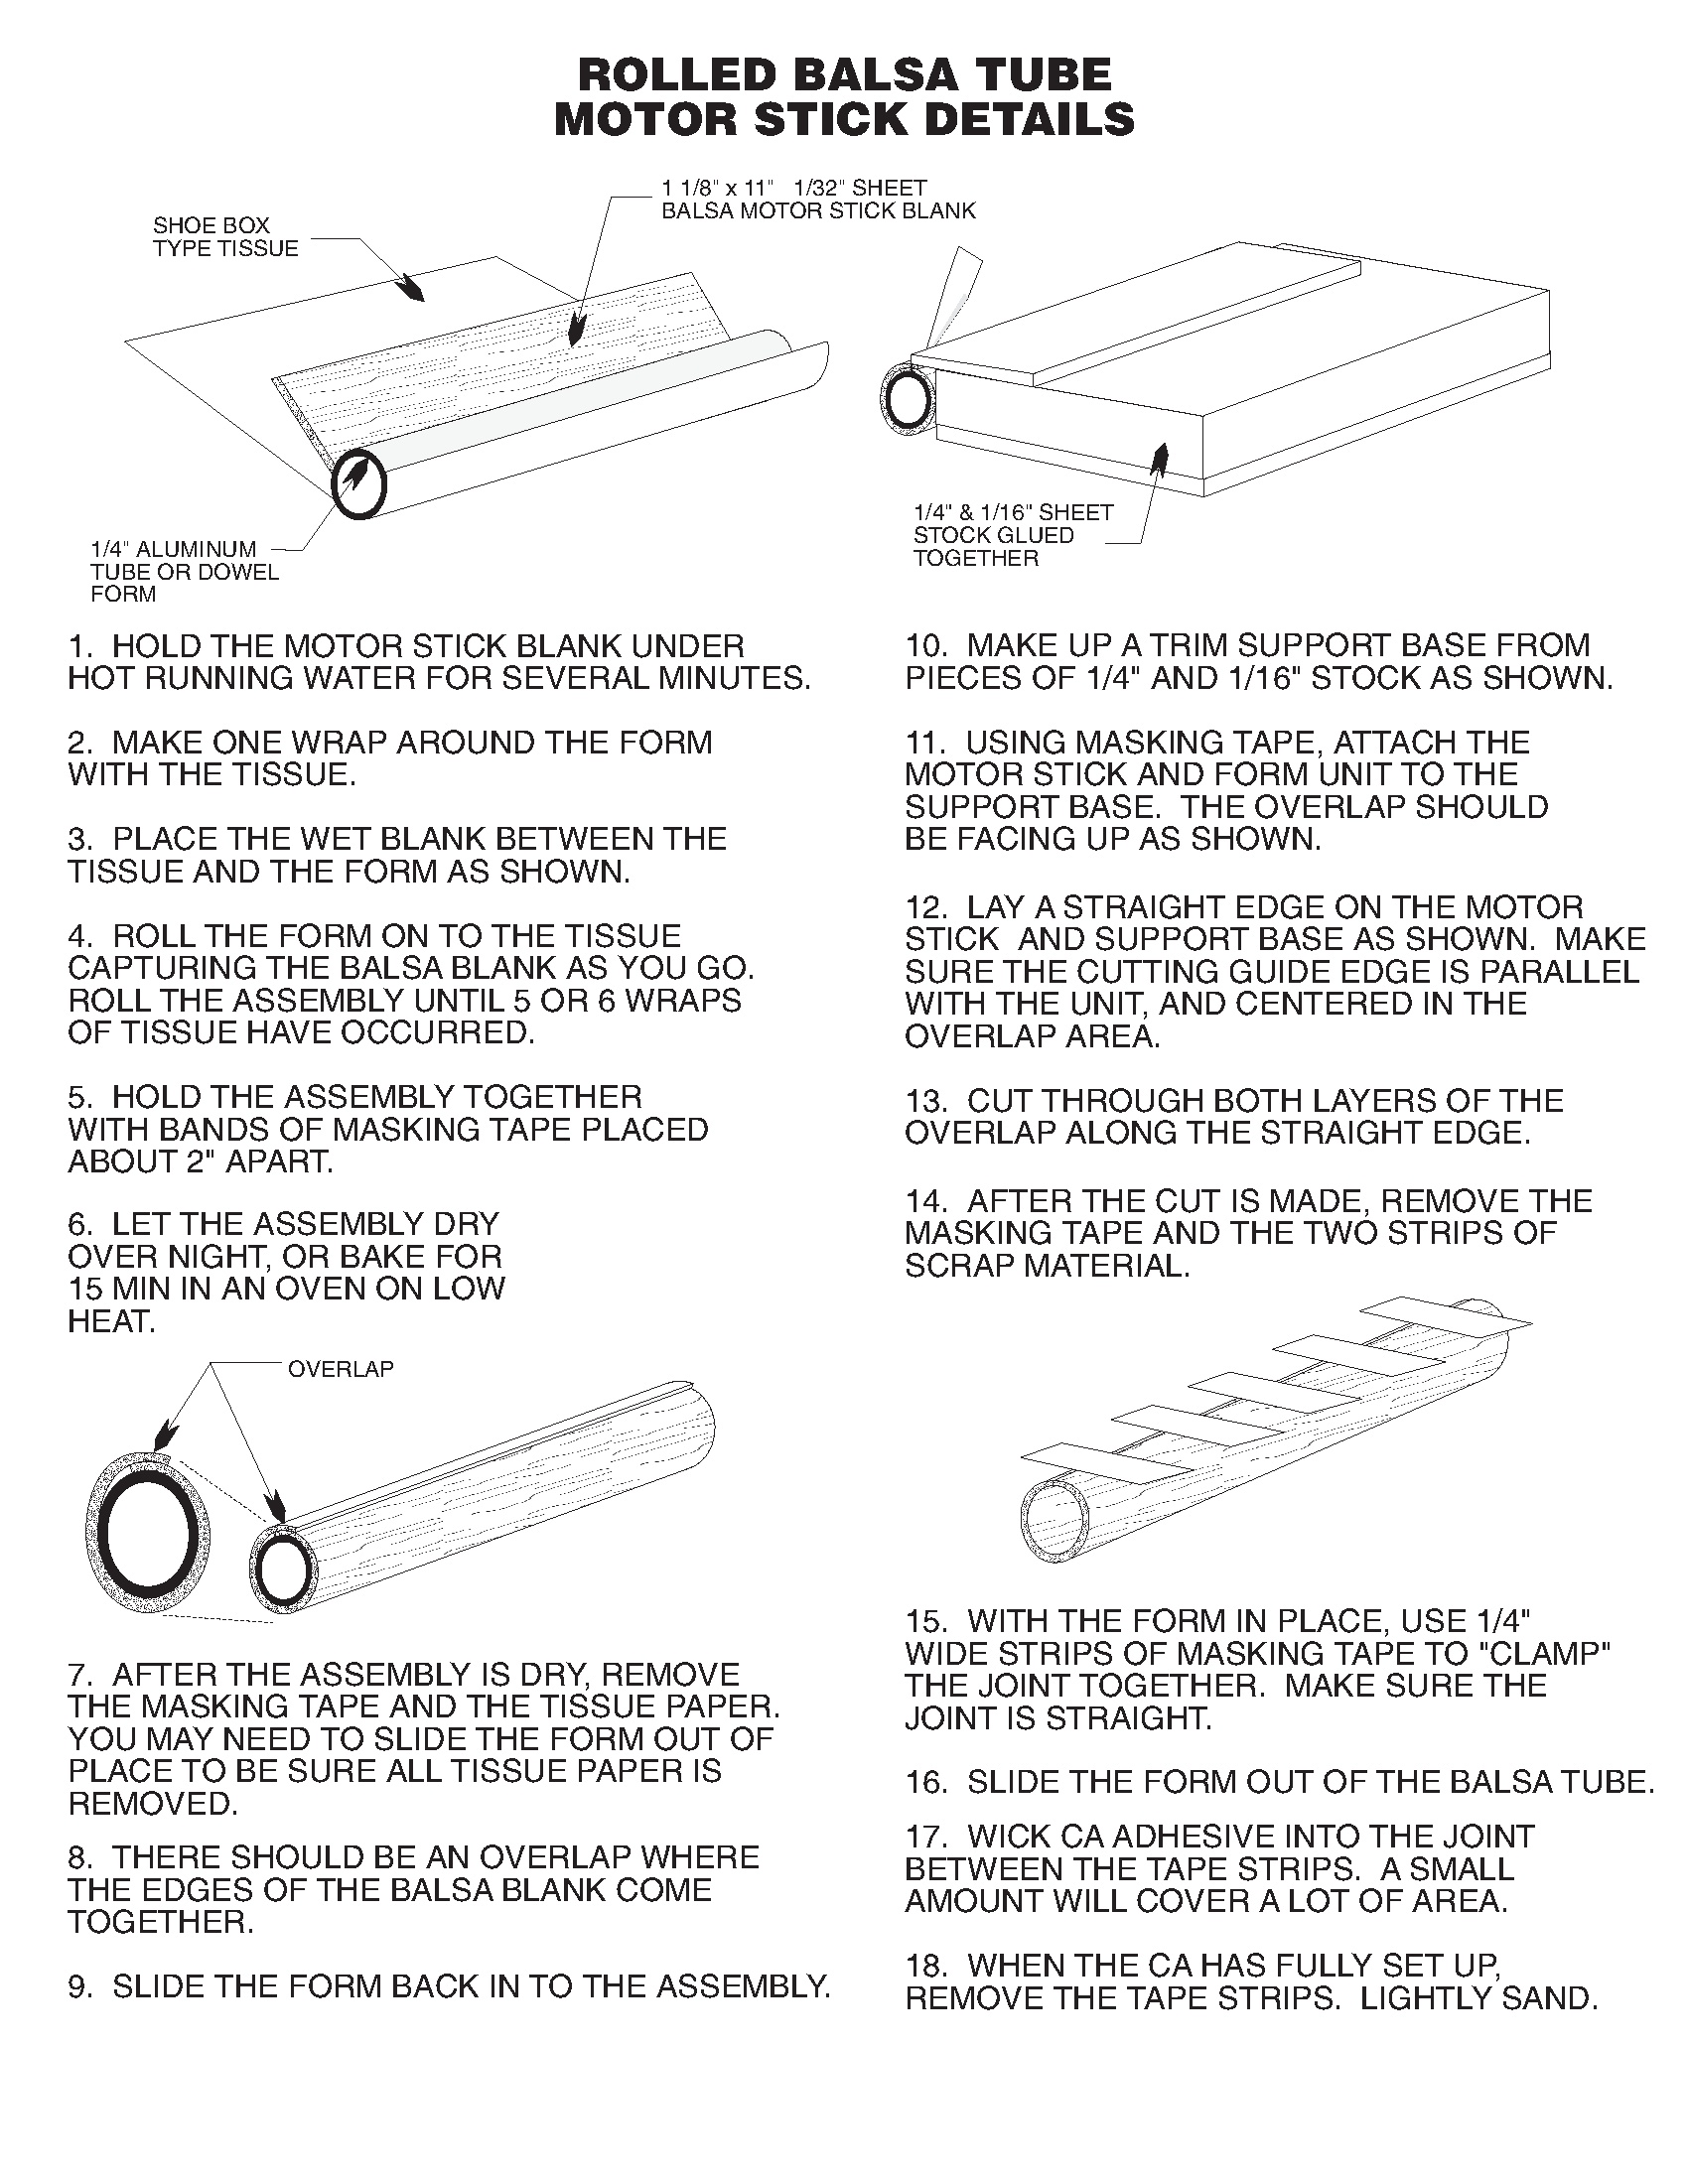
The No-Cal plans provided on this site call for rolled balsa tube motor sticks. They are not hard to make and offer more stiffness at a lighter weight than a stick type No-Cal motor stick. Presented here is one technique for making rolled balsa tube motor sticks.Click to add an engaging title. High quality images go a long way in looking professional online.
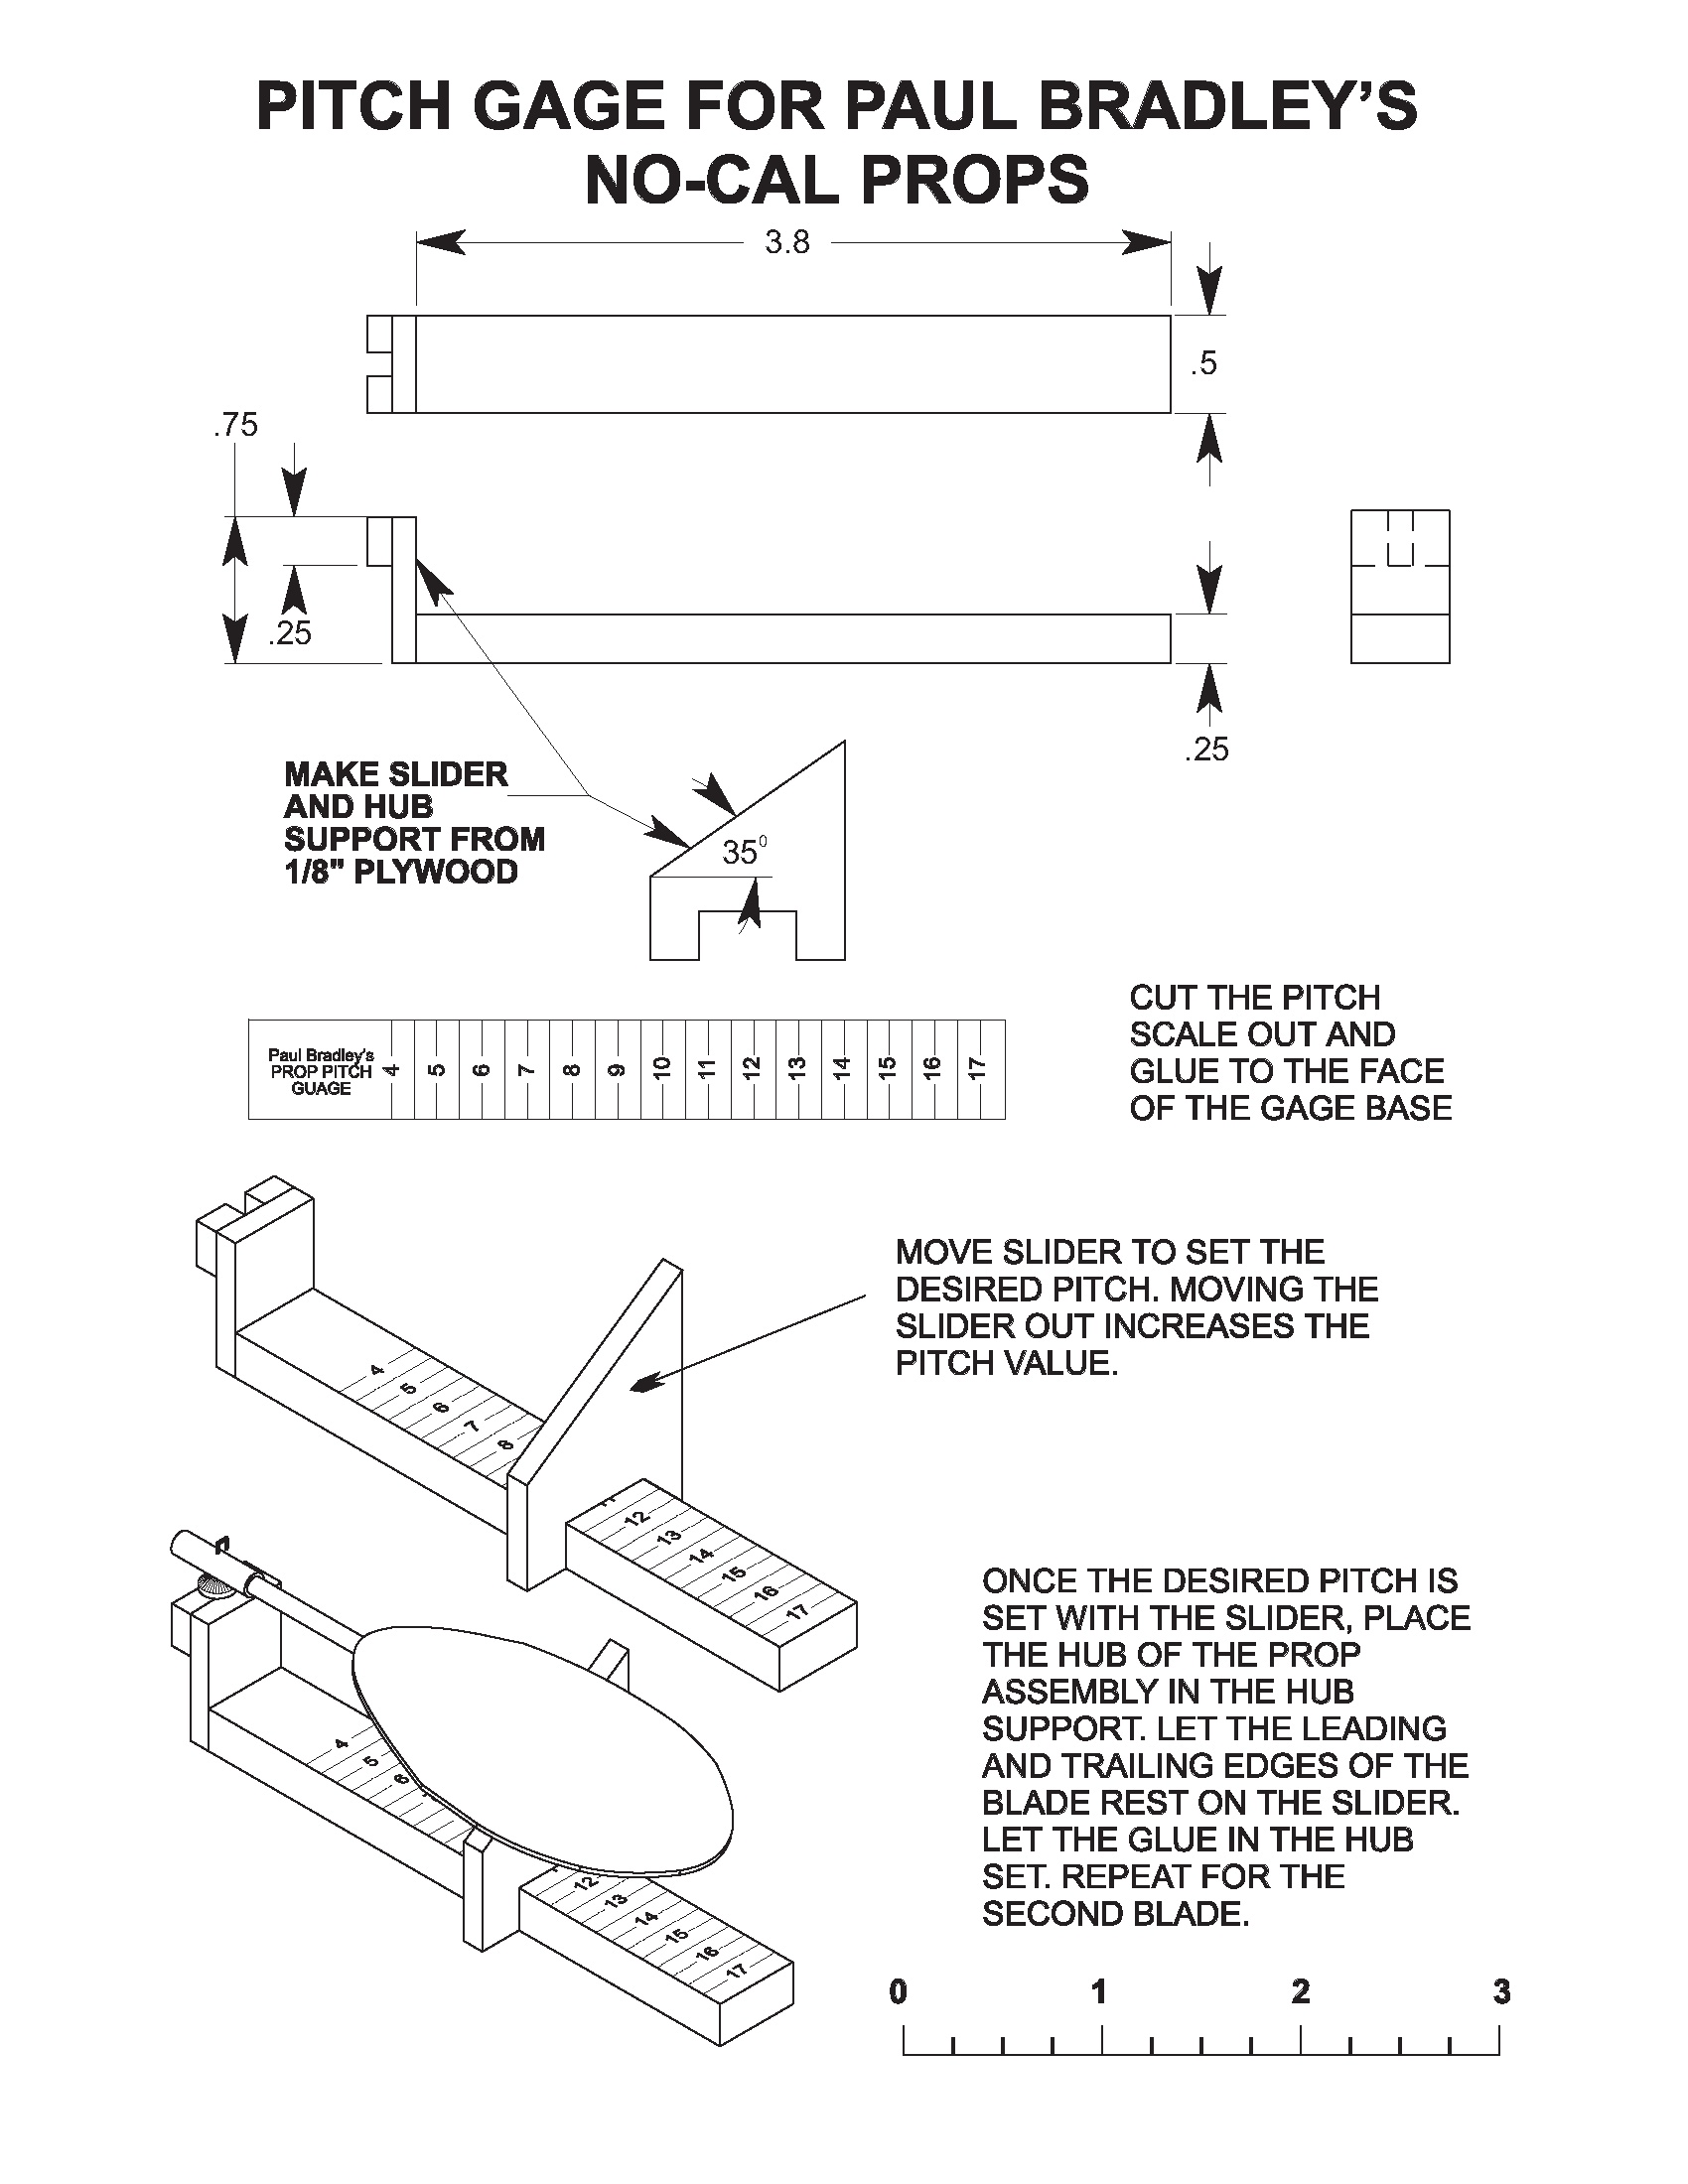
Being able to accurately set the pitch of the prop blades used on No-Cal models is important to their performance. The rubber used to make up individual motors can vary quite a bit between different batches of rubber. It can be helpful to have several props made up for a model with different pitch values. For lower torque rubber, using a prop with less pitch can be very helpful. When the rubber has more torque, using a higher pitch prop can be helpful. Using a pitch gauge allows you to make a variety of props with different pitch values.
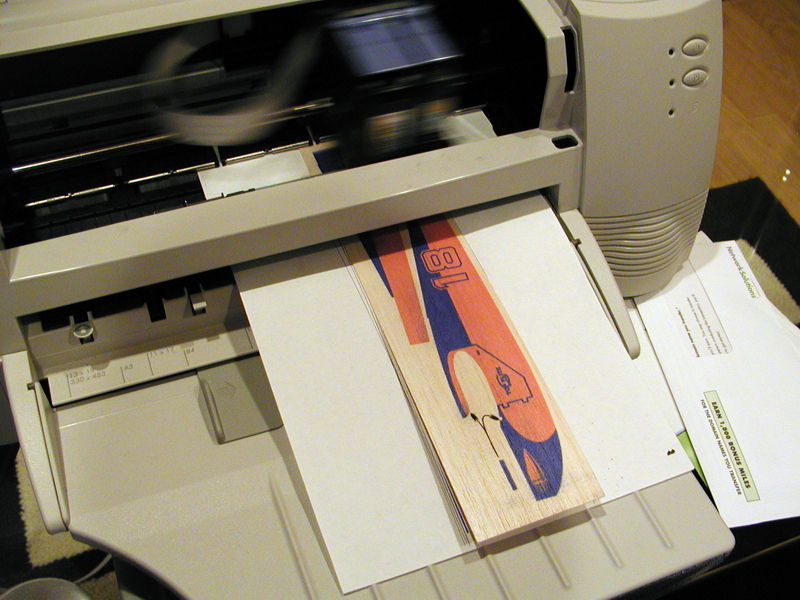
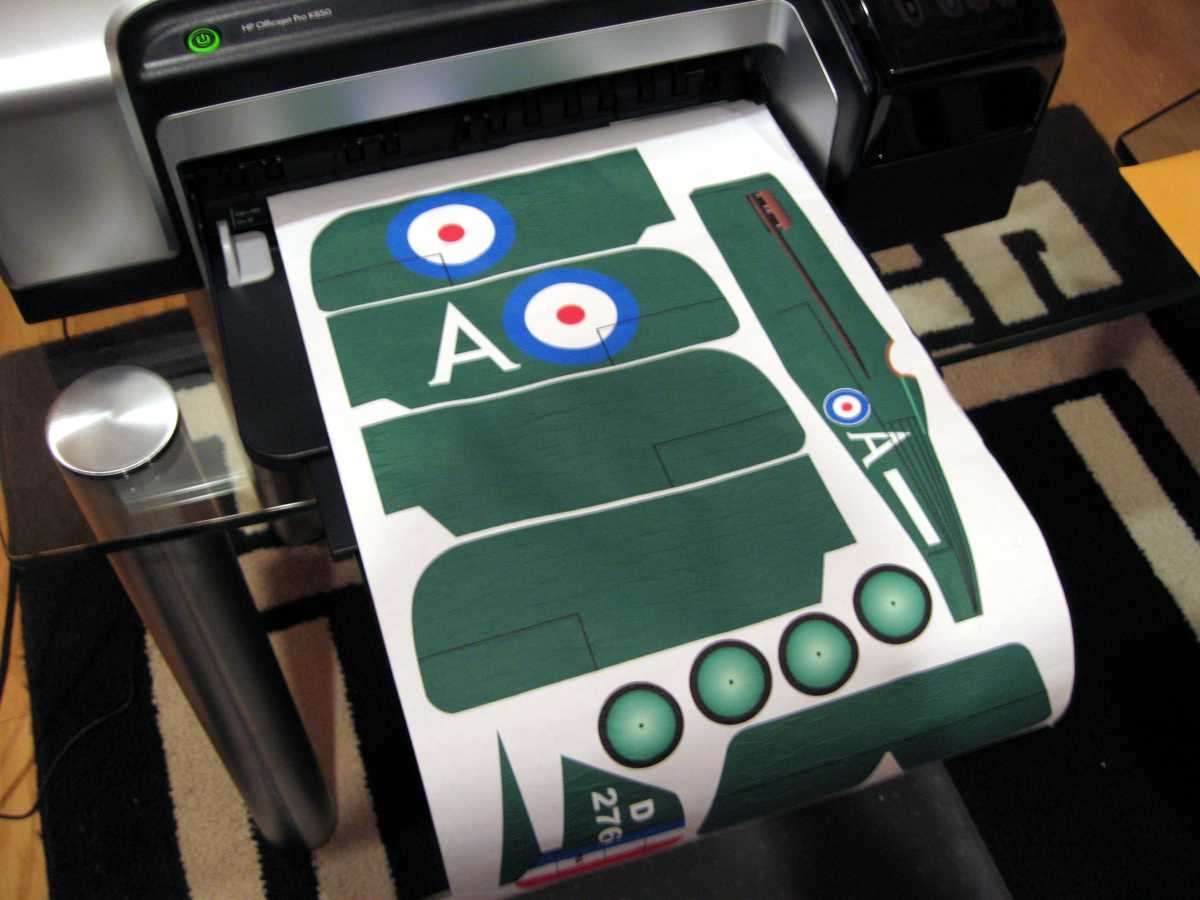
When it comes to indoor and micro models, weight is everything. We all love a nice looking model, but as the size begins to shrink the finish is often sacrificed in the name of saving weight. If you happen to use balsa for your your indoor and micro creations, we have a solution to the color and markings weight problem. Thanks to the technology of computers and ink jet printers we can create some nice looking models with no weight gain. Let us say that again .... no weight gain.
This short pictorial article describes a process for printing color and markings directly on balsa using an ink jet printer. You can create your killer design and then print it right on the balsa sheets that you will be using to build the model. While your at it, you can add some color and markings to dress up the finished model. One of the best parts is the color and markings are applied before the model is even built, so you have something nice to look at while that special bird takes shape. Want to give it a try? ... we hope so.<== Click here to view the article.
Tissue paper is the preferred covering material for many light weight model airplanes. Prior to the availability of computer driven ink jet printers, modelers using tissue covering had to rely on a variety of methods to add color and markings. This consisted of using different colors of tissue, marking pens, ruling pens, and other techniques for applying color and details to a model's covering. When ink jet printers started becoming available for prices the modeler could afford, it did not take long for people to realize that ink jet printers and light weight tissue paper were made for each other. Using an ink jet printer it is possible to add just about any color, color combination, and marking detail to a sheet of tissue with no weight gain. Our use of the ink jet printer to apply color and markings to plain white tissue paper began around 1992. We have been using the process ever since to add eye appealing color and trim to our models.
This short pictorial article describes the process we use for printing color and markings directly on light weight tissue paper using an ink jet printer. It is surprisingly easy and any ink jet printer can be used. The resulting tissue can be used on light weight indoor models, outdoor models where weight is an issue, and even on heavier radio control models. In the latter case the ink jet tissue is applied over a film underlayment using clear dope. Want to give it a try? ... We hope so.<== Click on this link
The Flying Aces Club (FAC) has a fun event called No-Cal scale. These are profile models with a maximum wing span of 16 inches that must look like one of the many full size man carrying airplanes that have been built since the Wright brothers flew their first airplane. The term No-Cal comes a reference to the profile fuselage having "no calories". While flown both indoors and outdoors, the event is especially popular with people who fly indoors. The goal is to have the longest flight time among people entered in the No-Cal event. A very important factor in long flight time for rubber powered models is their weight. In consideration of that factor, No-Cal designs use a minimum of structure. Unnecessary wood, for example, just means you are carrying dead weight. That will reduce the maximum time aloft for the model. A situation people want to avoid.
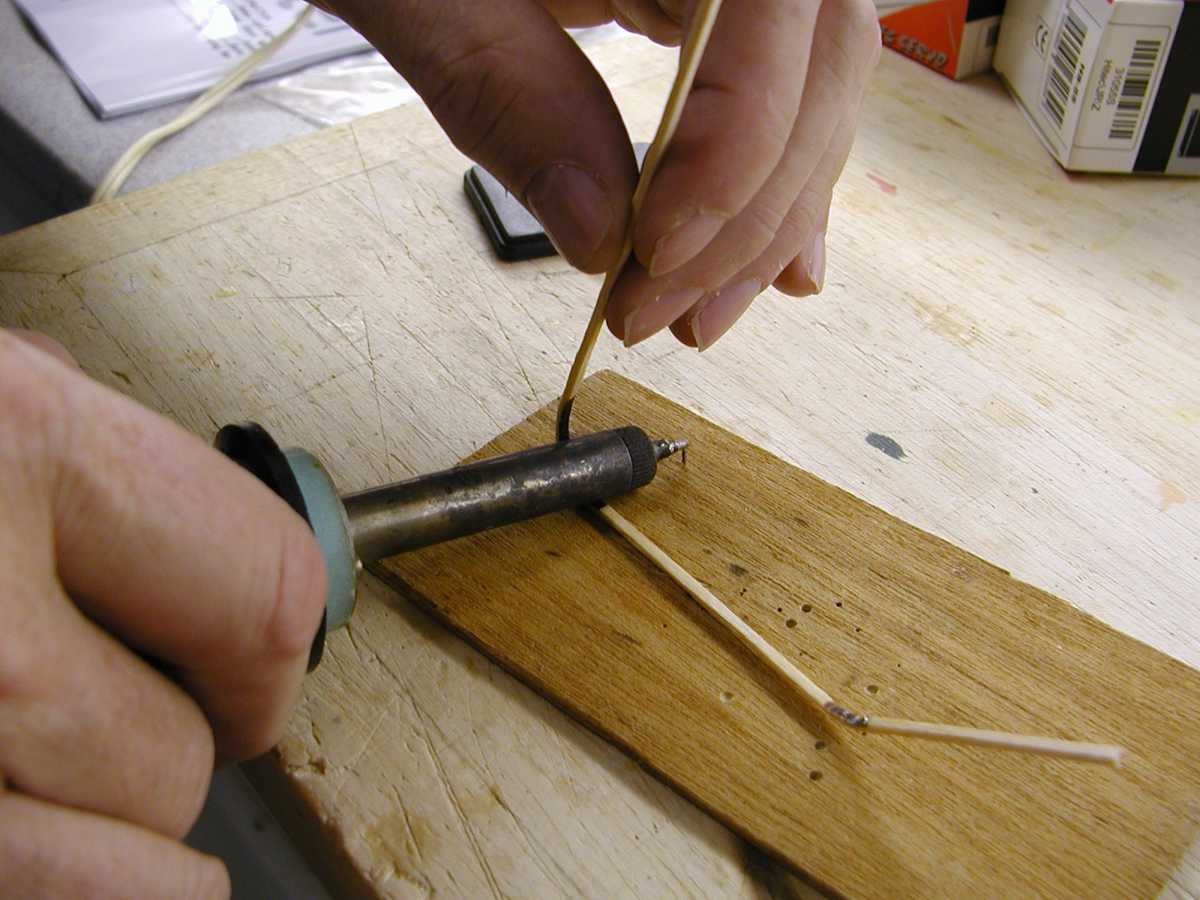
One method to keep the weight of a No-Cal model structure to a minimum is to form the outlines of the major components from molded balsa strips. Such an approach really helps get rid of wood in the structure that is not really necessary. A variety of methods are used by modelers to get balsa strip wood to bend to the shapes of the model subject component outlines. This short pictorial article is the method we have been using for many years to create molded balsa wood strip No-Cal outlines. We have found it to be fast, easy to perform, and satisfying in terms of the results. Want to give it a try? ... We hope so.<== Click on this link
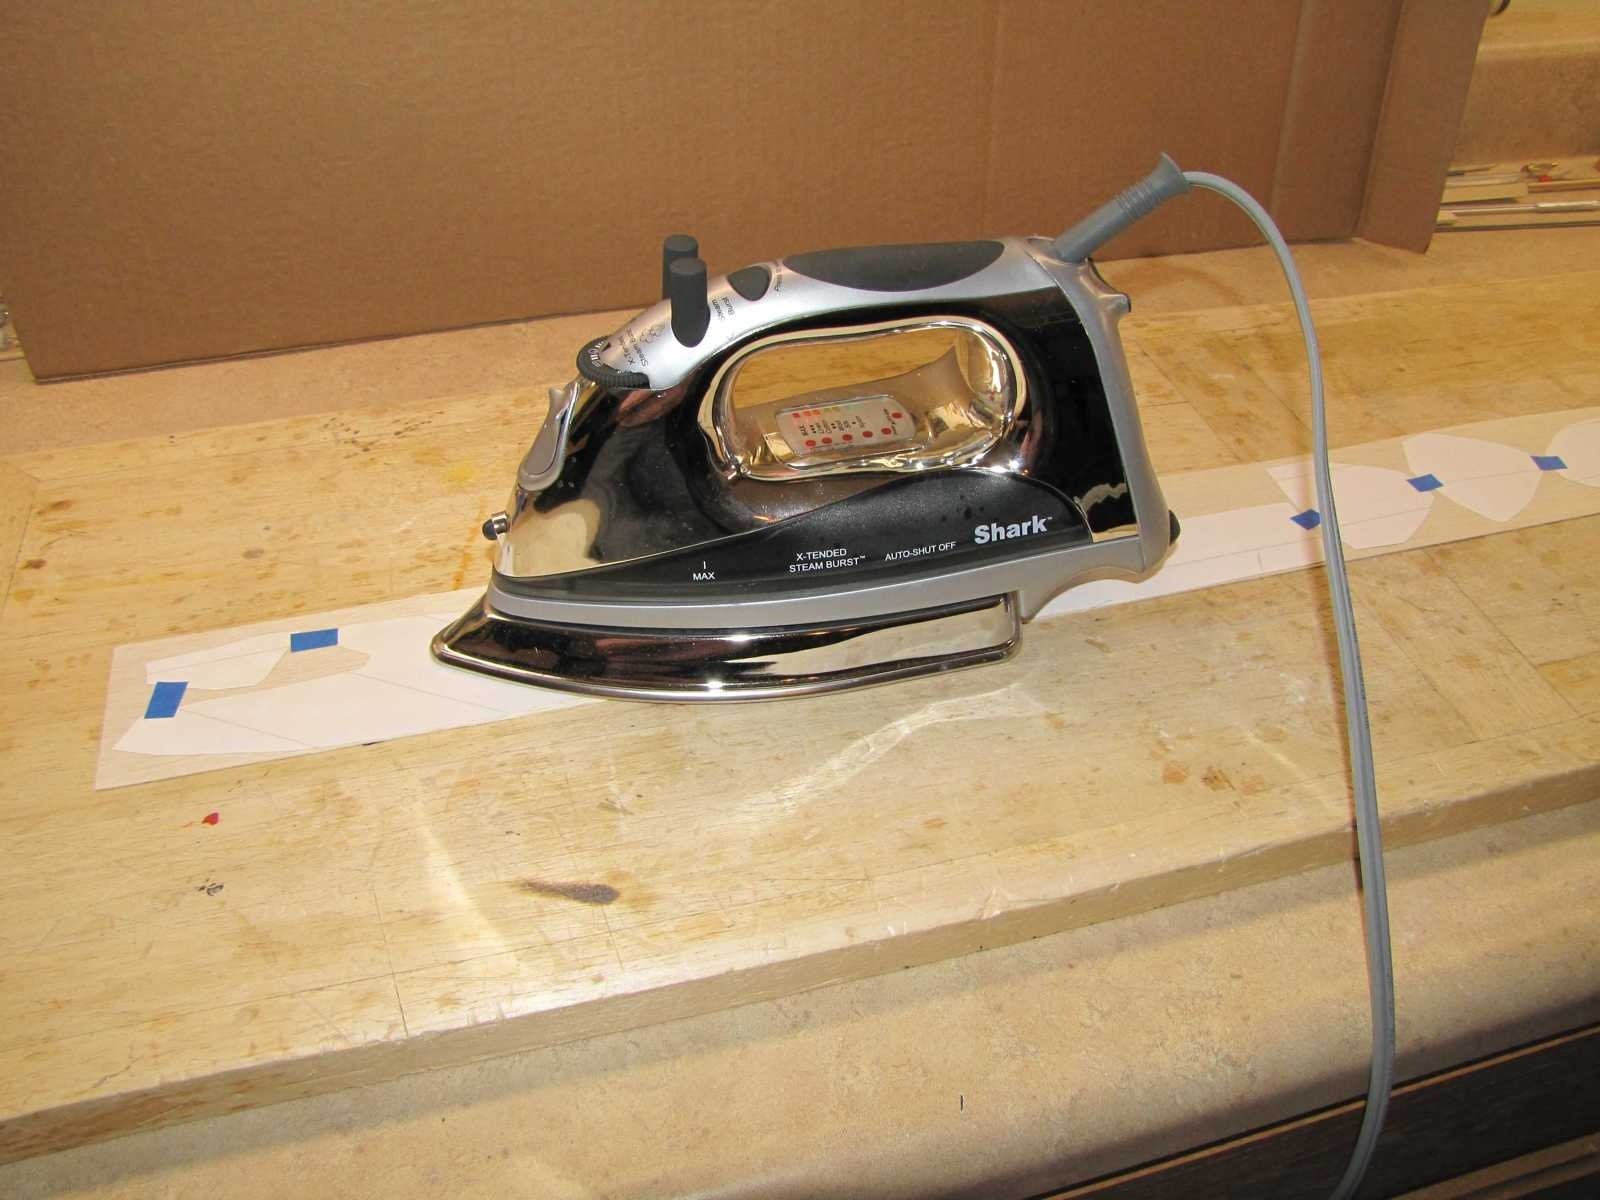
Keeping a small model light is important for its performance. The process of printing color and markings directly on balsa sheets has been described. Unfortunately, that process requires the use of a printer with a straight through feed path. Most people do not have that type of printer. To avoid the expense of buying a printer with a straight through feed path, there is an alternative method of creating light weight color and markings on balsa sheets. That method uses T-shirt iron on transfer paper. The T-shirt iron on transfer paper is intended for applying graphics to T-shirts or other fabric. It also works well for transferring model airplane graphics to balsa wood. It adds very little weight and has the advantage of working with any balsa sheet thickness. It also allows the use of any printer that can print letter size sheets.
The process we have been using is pretty simple and is described in this tutorial. Want to give it a try? ... We hop so. <== Click on this link
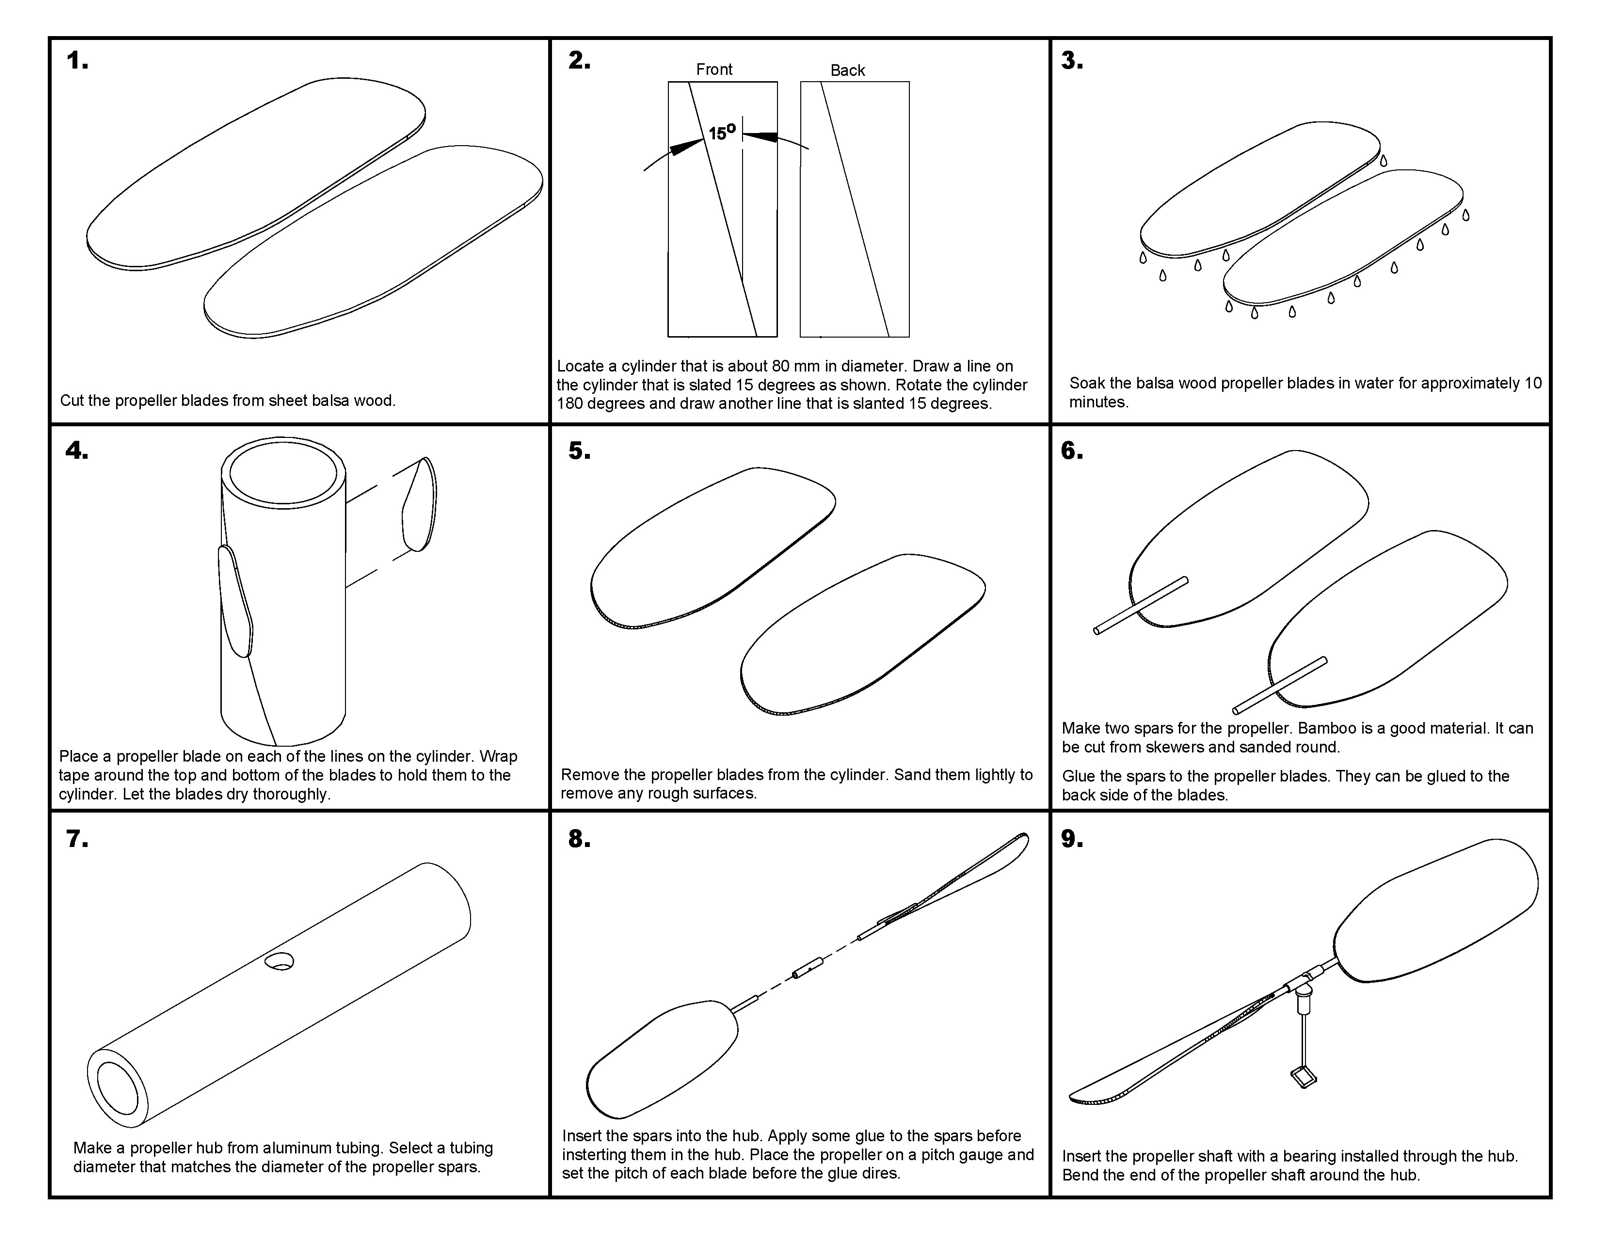
The Free Flight section of the Downloadable Plans page of this web site includes a group of Flying Aces Club (FAC) rules No-Cal models. When flown indoors, No-Cal models need to be as light as is practical. One way to keep the flying weight down is to make a balsa prop. A fairly simple way to do this is to make what is known as a "bucket" prop. The term "bucket" prop comes from props made from plastic food containers like cottage cheese. Those containers have a bucket shape. The blades are cut from the sides of the containers with the blade template set at an angle of 15 degrees from vertical. A similar prop blade is easy to make from balsa using the steps outlined here.
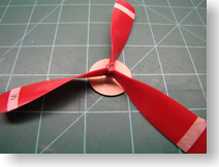
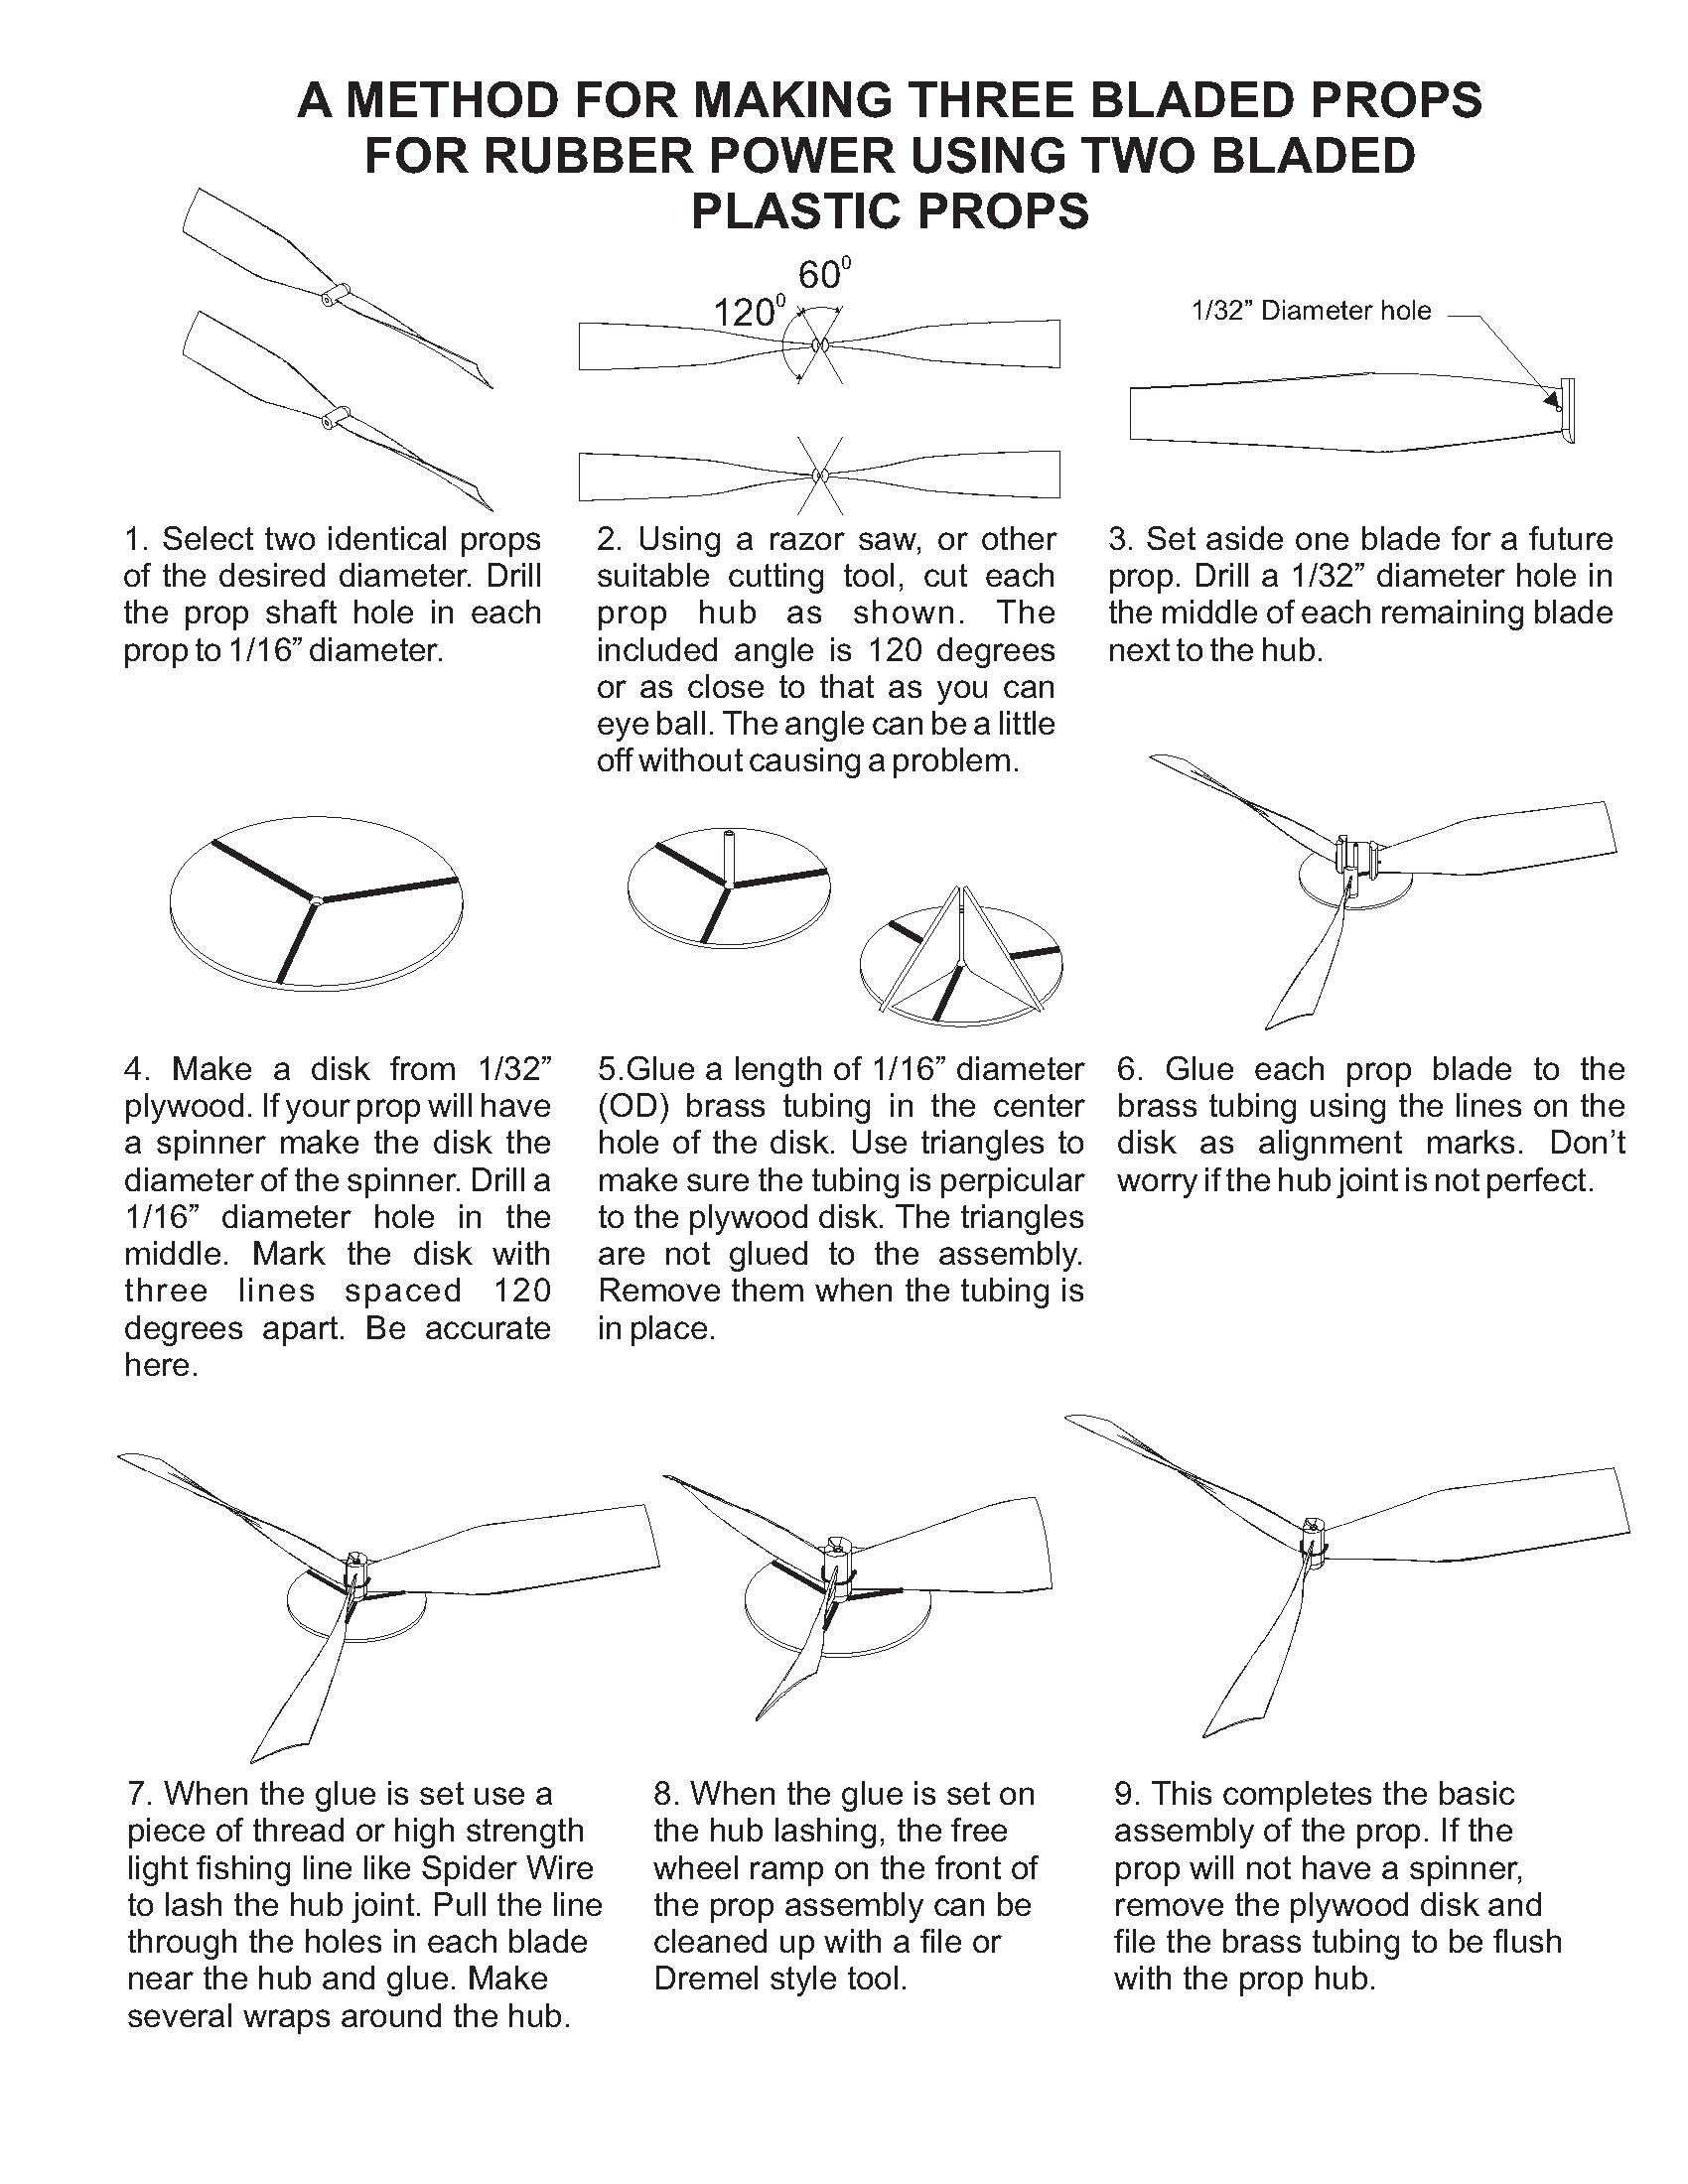
When building a rubber powered scale model, it is sometimes desirable to use a three bladed prop. The full scale aircraft being modeled may have used a three bladed prop, and/or the prop diameter may be limited requiring more than two blades to handle the planned rubber motor. It is fairly easy to create props with more than two blades using two blade plastic props.
Described here is the process for making a three blade prop from two blade propellers. The process can also be used for making props with more than three blades. The link below takes you to the process description.
The Rogallo wing is a flexible type of airfoil. In 1948, Gertrude Rogallo, and her husband Francis Rogallo, a NASA engineer, invented a self-inflating flexible wing they called the Parawing, also known after them as the "Rogallo Wing" and flexible wing. NASA considered Rogallo's flexible wing as an alternative recovery system for the Mercury and Gemini space capsules, and for possible use in other spacecraft landings, but the idea was dropped from Gemini in 1964 in favor of conventional parachutes.
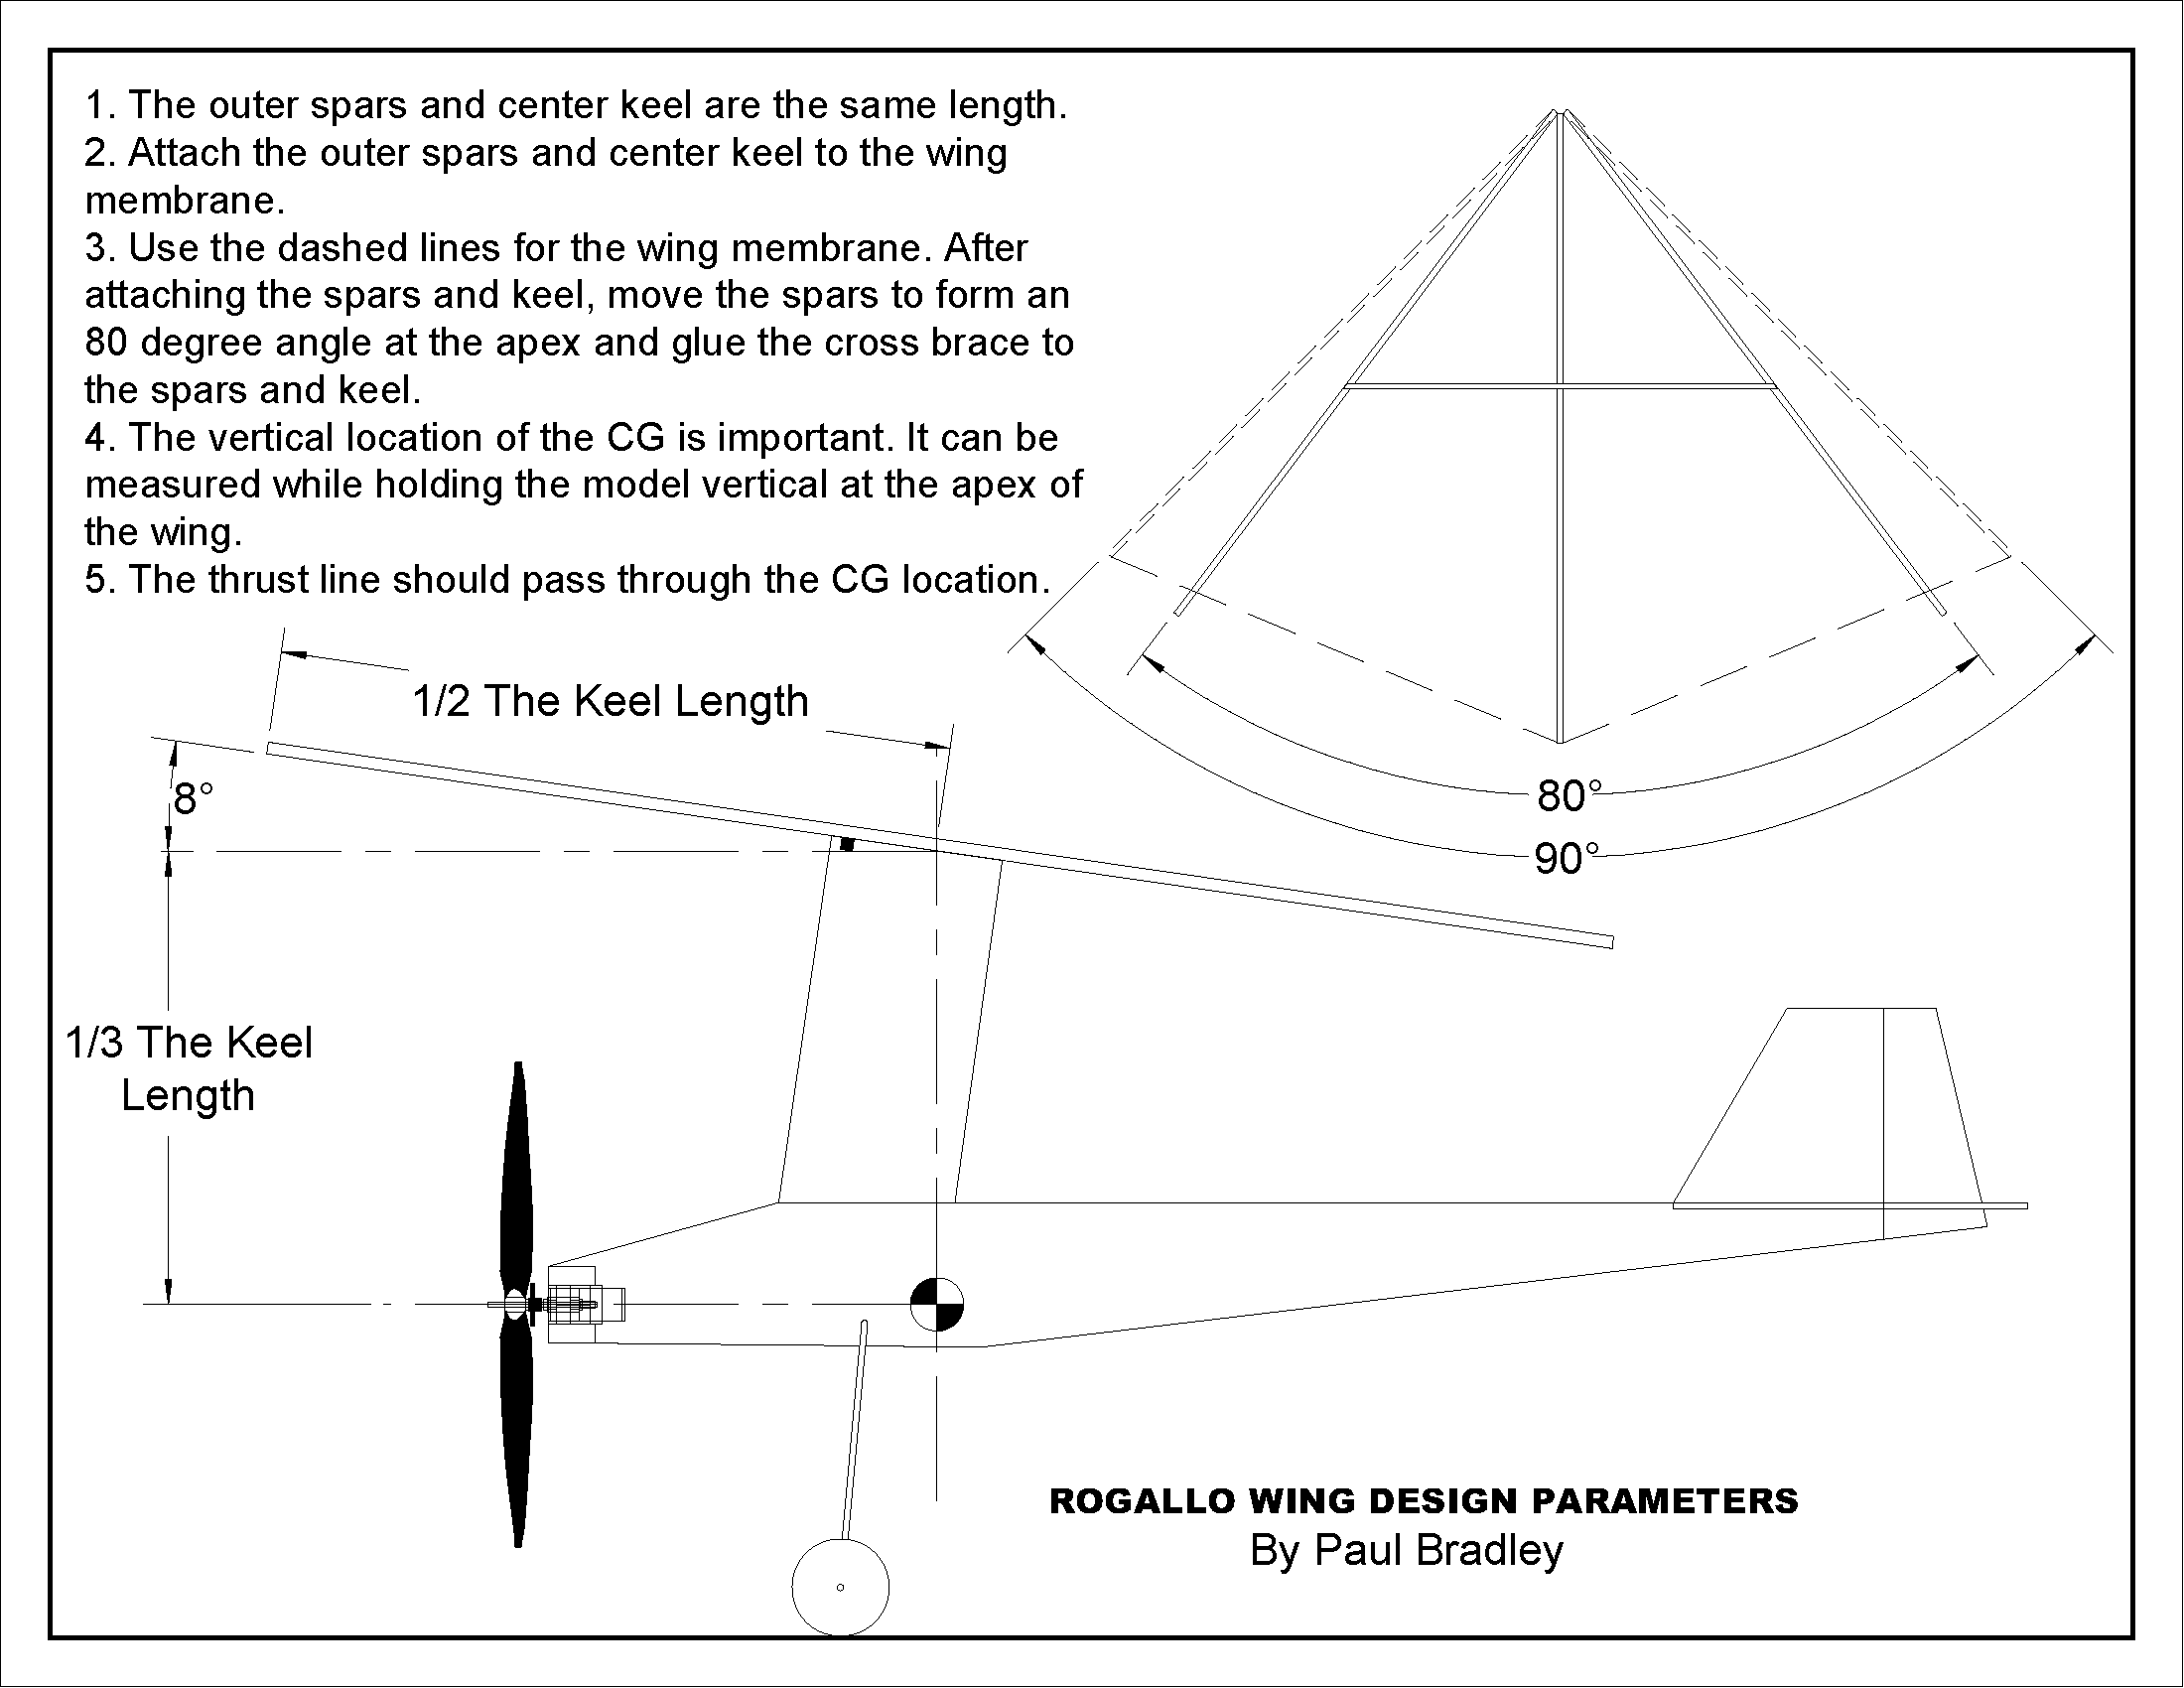
While NASA dropped the Rogallo wing, it has been adopted by modelers as a simple and unique way to create a flying machine. There have been many examples of models using Rogallo wings over the years. If you have ever had any interest in developing a Rogallo wing based model, there are some basic parameters to consider when laying out your design. Those parameters were presented to the modeling community many years ago by John Worth (AMA Hall of Fame member and NASA employee). The information presented by John Worth has been condensed in the document you will find at the link below.
Copyright 2026 Paul and Ralph Bradley's Model Airplane Hangout

